Light World

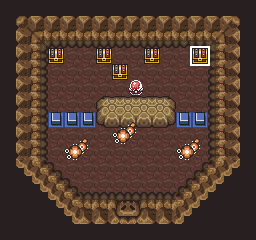
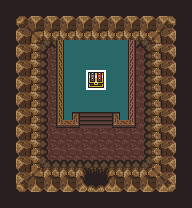
Death Mountain - Wall of Caves - Right cave [Bottom chest]

Active

Prerequisites

Map Location

Death Mountain - Wall of Caves - Right cave [Top Left chest]

Active

Prerequisites

Map Location

Death Mountain - Wall of Caves - Right Cave [Top Left Middle chest]

Active

Prerequisites

Map Location

Death Mountain - Wall of Caves - Right Cave [Top Right chest]

Active

Prerequisites

Map Location

Death Mountain - Wall of Caves - Right Cave [Top Right Middle chest]

Active

Prerequisites

Map Location

Death Mountain - Wall of Caves - Right Cave [Left chest]

Active

Prerequisites

Map Location

Death Mountain - Wall of Caves - Right Cave [Right chest]

Active

Prerequisites

Map Location

Death Mountain - Wall of Caves - Left cave

Active

Prerequisites

Map Location

Mimic Cave (from Turtle Rock)

Active

Prerequisites

Map Location

Cave under rocks West of Santuary

Active

Prerequisites

Map Location

Graveyard - Top Right grave

Active

Prerequisites

Map Location

Kakariko Well [bottom chest]

Active

Prerequisites

Map Location

Kakariko well [Center chest row of 3]

Active

Prerequisites

Map Location

Kakariko well [Left chest row of 3]

Active

Prerequisites

Map Location

[cave-021] Kakariko well [right chest row of 3]

Active

Prerequisites

Map Location

[cave-021] Kakariko well [top chest]

Active

Prerequisites

Map Location

[cave-022-B1] Thief's hut [bottom left chest]

Active

Prerequisites

Map Location

[cave-022-B1] Thief's hut [bottom right chest]

Active

Prerequisites

Map Location

[cave-022-B1] Thief's hut [top chest]

Active

Prerequisites

Map Location

[cave-022-B1] Thief's hut [top left chest]

Active

Prerequisites

Map Location

[cave-022-B1] Thief's hut [top right chest]

Active

Prerequisites

Map Location

[cave-026] chicken house

Active

Prerequisites

Map Location

[cave-031] Tavern

Active

Prerequisites

Map Location

[cave-034] Hyrule Castle secret entrance

Active

Prerequisites

Map Location

[cave-035] Sahasrahla's Hut [center chest]

Active

Prerequisites

Map Location

[cave-035] Sahasrahla's Hut [left chest]

Active

Prerequisites

Map Location

[cave-035] Sahasrahla's Hut [right chest]

Active

Prerequisites

Map Location

[cave-040] Link's House

Active

Prerequisites

Map Location

[cave-044] Aginah's cave

Active

Prerequisites

Map Location

[cave-047] Dam

Active

Prerequisites

Map Location

[cave-050] cave southwest of Lake Hylia - generous guy

Active

Prerequisites

Map Location

[cave-050] cave southwest of Lake Hylia [bottom left chest]

Active

Prerequisites

Map Location

[cave-050] cave southwest of Lake Hylia [bottom right chest]

Active

Prerequisites

Map Location

[cave-050] cave southwest of Lake Hylia [top left chest]

Active

Prerequisites

Map Location

[cave-050] cave southwest of Lake Hylia [top right chest]

Active

Prerequisites

Map Location

[cave-051] Ice Cave

Active

Prerequisites

Map Location

Bombos

Active

Prerequisites

Map Location

Bottle Vendor

Active

Prerequisites

Map Location

Ether

Active

Prerequisites

Map Location

Hobo

Active

Prerequisites

Map Location

King Zora

Active

Prerequisites

Map Location

Library

Active

Prerequisites

Map Location

Old mountain man

Active

Prerequisites

Map Location

Piece of Heart (Dam)

Active

Prerequisites

Map Location

Piece of Heart (Death Mountain - floating island)

Active

Prerequisites

Map Location

Piece of Heart (Desert - northeast corner)

Active

Prerequisites

Map Location

Piece of Heart (Desert - west side)

Active

Prerequisites

Map Location

Piece of Heart (Graveyard)

Active

Prerequisites

Map Location

Piece of Heart (Lake Hylia)

Active

Prerequisites

Map Location

Piece of Heart (Lumberjack Tree)

Active

Prerequisites

Map Location

Piece of Heart (Maze Race)

Active

Prerequisites

Map Location

Piece of Heart (south of Haunted Grove)

Active

Prerequisites

Map Location

Piece of Heart (Spectacle Rock Cave)

Active

Prerequisites

Map Location

Piece of Heart (Spectacle Rock)

Active

Prerequisites

Map Location

Piece of Heart (Thieves' Forest Hideout)

Active

Prerequisites

Map Location

Piece of Heart (Zora's River)

Active

Prerequisites

Map Location

Purple Chest

Active

Prerequisites

Map Location

Sahasrahla

Active

Prerequisites

Map Location

Sick Kid

Active

Prerequisites

Map Location

Dark World

[cave-055] Spike cave

Active

Prerequisites

Map Location

[cave-056] Dark World Death Mountain - cave under boulder [bottom left chest]

Active

Prerequisites

Map Location

[cave-056] Dark World Death Mountain - cave under boulder [bottom right chest]

Active

Prerequisites

Map Location

[cave-056] Dark World Death Mountain - cave under boulder [top left chest]

Active

Prerequisites

Map Location

[cave-056] Dark World Death Mountain - cave under boulder [top right chest]

Active

Prerequisites

Map Location

[cave-057-1F] Dark World Death Mountain - cave from top to bottom [bottom chest]

Active

Prerequisites

Map Location

[cave-057-1F] Dark World Death Mountain - cave from top to bottom [top chest]

Active

Prerequisites

Map Location

[cave-062] C-shaped house

Active

Prerequisites

Map Location

[cave-063] doorless hut

Active

Prerequisites

Map Location

[cave-071] Misery Mire west area [left chest]

Active

Prerequisites

Map Location

[cave-071] Misery Mire west area [right chest]

Active

Prerequisites

Map Location

[cave-073] cave northeast of swamp palace - generous guy

Active

Prerequisites

Map Location

[cave-073] cave northeast of swamp palace [bottom chest]

Active

Prerequisites

Map Location

[cave-073] cave northeast of swamp palace [bottom middle chest]

Active

Prerequisites

Map Location

[cave-073] cave northeast of swamp palace [top chest]

Active

Prerequisites

Map Location

[cave-073] cave northeast of swamp palace [top middle chest]

Active

Prerequisites

Map Location

Catfish

Active

Prerequisites

Map Location

Flute Boy

Active

Prerequisites

Map Location

Piece of Heart (Dark World - bumper cave)

Active

Prerequisites

Map Location

Piece of Heart (Dark World blacksmith pegs)

Active

Prerequisites

Map Location

Piece of Heart (Pyramid)

Active

Prerequisites

Map Location

Hyrule Castle Escape

[dungeon-C-1F] Sanctuary

Active

Prerequisites

Map Location

[dungeon-C-B1] Escape - final basement room [left chest]

Active

Prerequisites

Map Location

[dungeon-C-B1] Escape - final basement room [middle chest]

Active

Prerequisites

Map Location

[dungeon-C-B1] Escape - final basement room [right chest]

Active

Prerequisites

Map Location

[dungeon-C-B1] Escape - first B1 room

Active

Prerequisites

Map Location

[dungeon-C-B1] Hyrule Castle - boomerang room

Active

Prerequisites

Map Location

[dungeon-C-B1] Hyrule Castle - map room

Active

Prerequisites

Map Location

[dungeon-C-B3] Hyrule Castle - next to Zelda

Active

Prerequisites

Map Location

Eastern Palace

[dungeon-L1-1F] Eastern Palace - big ball room

Active

Prerequisites

Map Location

[dungeon-L1-1F] Eastern Palace - big chest

Active

Prerequisites

Map Location

[dungeon-L1-1F] Eastern Palace - Big key

Active

Prerequisites

Map Location

[dungeon-L1-1F] Eastern Palace - compass room

Active

Prerequisites

Map Location

[dungeon-L1-1F] Eastern Palace - map room

Active

Prerequisites

Map Location

Desert Palace

[dungeon-L2-B1] Desert Palace - big chest

Active

Prerequisites

Map Location

[dungeon-L2-B1] Desert Palace - Big key room

Active

Prerequisites

Map Location

[dungeon-L2-B1] Desert Palace - compass room

Active

Prerequisites

Map Location

[dungeon-L2-B1] Desert Palace - Map room

Active

Prerequisites

Map Location

Tower of Hera

[dungeon-L3-1F] Tower of Hera - first floor

Active

Prerequisites

Map Location

[dungeon-L3-2F] Tower of Hera - Entrance

Active

Prerequisites

Map Location

[dungeon-L3-4F] Tower of Hera - 4F [small chest]

Active

Prerequisites

Map Location

[dungeon-L3-4F] Tower of Hera - big chest

Active

Prerequisites

Map Location

Hyrule Castle Tower

[dungeon-A1-2F] Hyrule Castle Tower - 2 knife guys room

Active

Prerequisites

Map Location

[dungeon-A1-3F] Hyrule Castle Tower - maze room

Active

Prerequisites

Map Location

Dark Palace

[dungeon-D1-1F] Dark Palace - big chest

Active

Prerequisites

Map Location

[dungeon-D1-1F] Dark Palace - big key room

Active

Prerequisites

Map Location

[dungeon-D1-1F] Dark Palace - compass room

Active

Prerequisites

Map Location

[dungeon-D1-1F] Dark Palace - jump room [left chest]

Active

Prerequisites

Map Location

[dungeon-D1-1F] Dark Palace - jump room [right chest]

Active

Prerequisites

Map Location

[dungeon-D1-1F] Dark Palace - maze room [bottom chest]

Active

Prerequisites

Map Location

[dungeon-D1-1F] Dark Palace - maze room [top chest]

Active

Prerequisites

Map Location

[dungeon-D1-1F] Dark Palace - spike statue room

Active

Prerequisites

Map Location

[dungeon-D1-1F] Dark Palace - statue push room

Active

Prerequisites

Map Location

[dungeon-D1-B1] Dark Palace - room leading to Helmasaur [left chest]

Active

Prerequisites

Map Location

[dungeon-D1-B1] Dark Palace - room leading to Helmasaur [right chest]

Active

Prerequisites

Map Location

[dungeon-D1-B1] Dark Palace - shooter room

Active

Prerequisites

Map Location

[dungeon-D1-B1] Dark Palace - turtle stalfos room

Active

Prerequisites

Map Location

Swamp Palace

[dungeon-D2-1F] Swamp Palace - first room

Active

Prerequisites

Map Location

[dungeon-D2-B1] Swamp Palace - big chest

Active

Prerequisites

Map Location

[dungeon-D2-B1] Swamp Palace - big key room

Active

Prerequisites

Map Location

[dungeon-D2-B1] Swamp Palace - map room

Active

Prerequisites

Map Location

[dungeon-D2-B1] Swamp Palace - push 4 blocks room

Active

Prerequisites

Map Location

[dungeon-D2-B1] Swamp Palace - south of hookshot room

Active

Prerequisites

Map Location

[dungeon-D2-B2] Swamp Palace - flooded room [left chest]

Active

Prerequisites

Map Location

[dungeon-D2-B2] Swamp Palace - flooded room [right chest]

Active

Prerequisites

Map Location

[dungeon-D2-B2] Swamp Palace - hidden waterfall door room

Active

Prerequisites

Map Location

Skull Woods

[dungeon-D3-B1] Skull Woods - big chest

Active

Prerequisites

Map Location

[dungeon-D3-B1] Skull Woods - Big Key room

Active

Prerequisites

Map Location

[dungeon-D3-B1] Skull Woods - Compass room

Active

Prerequisites

Map Location

[dungeon-D3-B1] Skull Woods - east of Fire Rod room

Active

Prerequisites

Map Location

[dungeon-D3-B1] Skull Woods - Entrance to part 2

Active

Prerequisites

Map Location

[dungeon-D3-B1] Skull Woods - Gibdo/Stalfos room

Active

Prerequisites

Map Location

[dungeon-D3-B1] Skull Woods - south of Fire Rod room

Active

Prerequisites

Map Location

Thieves Town

[dungeon-D4-1F] Thieves' Town - Room above boss

Active

Prerequisites

Map Location

[dungeon-D4-B1] Thieves' Town - Bottom left of huge room [bottom right chest]

Active

Prerequisites

Map Location

[dungeon-D4-B1] Thieves' Town - Bottom left of huge room [top left chest]

Active

Prerequisites

Map Location

[dungeon-D4-B1] Thieves' Town - Bottom right of huge room

Active

Prerequisites

Map Location

[dungeon-D4-B1] Thieves' Town - Top left of huge room

Active

Prerequisites

Map Location

[dungeon-D4-B2] Thieves' Town - big chest

Active

Prerequisites

Map Location

[dungeon-D4-B2] Thieves' Town - next to Blind

Active

Prerequisites

Map Location

Ice Palace

[dungeon-D5-B1] Ice Palace - Big Key room

Active

Prerequisites

Map Location

[dungeon-D5-B1] Ice Palace - compass room

Active

Prerequisites

Map Location

[dungeon-D5-B2] Ice Palace - map room

Active

Prerequisites

Map Location

[dungeon-D5-B3] Ice Palace - spike room

Active

Prerequisites

Map Location

[dungeon-D5-B4] Ice Palace - above Blue Mail room

Active

Prerequisites

Map Location

[dungeon-D5-B5] Ice Palace - b5 up staircase

Active

Prerequisites

Map Location

[dungeon-D5-B5] Ice Palace - big chest

Active

Prerequisites

Map Location

Misery Mire

[dungeon-D6-B1] Misery Mire - big chest

Active

Prerequisites

Map Location

[dungeon-D6-B1] Misery Mire - big hub room

Active

Prerequisites

Map Location

[dungeon-D6-B1] Misery Mire - big key

Active

Prerequisites

Map Location

[dungeon-D6-B1] Misery Mire - compass

Active

Prerequisites

Map Location

[dungeon-D6-B1] Misery Mire - end of bridge

Active

Prerequisites

Map Location

[dungeon-D6-B1] Misery Mire - map room

Active

Prerequisites

Map Location

[dungeon-D6-B1] Misery Mire - spike room

Active

Prerequisites

Map Location

Turtle Rock

[dungeon-D7-1F] Turtle Rock - Chain chomp room

Active

Prerequisites

Map Location

[dungeon-D7-1F] Turtle Rock - compass room

Active

Prerequisites

Map Location

[dungeon-D7-1F] Turtle Rock - Map room [left chest]

Active

Prerequisites

Map Location

[dungeon-D7-1F] Turtle Rock - Map room [right chest]

Active

Prerequisites

Map Location

[dungeon-D7-B1] Turtle Rock - big chest

Active

Prerequisites

Map Location

[dungeon-D7-B1] Turtle Rock - big key room

Active

Prerequisites

Map Location

[dungeon-D7-B1] Turtle Rock - Roller switch room

Active

Prerequisites

Map Location

[dungeon-D7-B2] Turtle Rock - Eye bridge room [bottom left chest]

Active

Prerequisites

Map Location

[dungeon-D7-B2] Turtle Rock - Eye bridge room [bottom right chest]

Active

Prerequisites

Map Location

[dungeon-D7-B2] Turtle Rock - Eye bridge room [top left chest]

Active

Prerequisites

Map Location

[dungeon-D7-B2] Turtle Rock - Eye bridge room [top right chest]

Active

Prerequisites

Map Location

Ganon's Tower

[dungeon-A2-1F] Ganon's Tower - above Armos

Active

Prerequisites

Map Location

[dungeon-A2-1F] Ganon's Tower - big chest

Active

Prerequisites

Map Location

[dungeon-A2-1F] Ganon's Tower - compass room [bottom left chest]

Active

Prerequisites

Map Location

[dungeon-A2-1F] Ganon's Tower - compass room [bottom right chest]

Active

Prerequisites

Map Location

[dungeon-A2-1F] Ganon's Tower - compass room [top left chest]

Active

Prerequisites

Map Location

[dungeon-A2-1F] Ganon's Tower - compass room [top right chest]

Active

Prerequisites

Map Location

[dungeon-A2-1F] Ganon's Tower - down right staircase from entrance [left chest]

Active

Prerequisites

Map Location

[dungeon-A2-1F] Ganon's Tower - down right staircase from entrance [right chest]

Active

Prerequisites

Map Location

[dungeon-A2-1F] Ganon's Tower - east of down right staircase from entrace

Prerequisites

Map Location

[dungeon-A2-1F] Ganon's Tower - map room

Active

Prerequisites

Map Location

[dungeon-A2-1F] Ganon's Tower - north of gap room [bottom left chest]

Active

Prerequisites

Map Location

[dungeon-A2-1F] Ganon's Tower - north of gap room [bottom right chest]

Active

Prerequisites

Map Location

[dungeon-A2-1F] Ganon's Tower - north of gap room [top left chest]

Active

Prerequisites

Map Location

[dungeon-A2-1F] Ganon's Tower - north of gap room [top right chest]

Active

Prerequisites

Map Location

[dungeon-A2-1F] Ganon's Tower - north of teleport room

Active

Prerequisites

Map Location

[dungeon-A2-1F] Ganon's Tower - west of teleport room [bottom left chest]

Active

Prerequisites

Map Location

[dungeon-A2-1F] Ganon's Tower - west of teleport room [bottom right chest]

Active

Prerequisites

Map Location

[dungeon-A2-1F] Ganon's Tower - west of teleport room [top left chest]

Active

Prerequisites

Map Location

[dungeon-A2-1F] Ganon's Tower - west of teleport room [top right chest]

Active

Prerequisites

Map Location

[dungeon-A2-6F] Ganon's Tower - before Moldorm

Active

Prerequisites

Map Location

[dungeon-A2-6F] Ganon's Tower - Moldorm room

Active

Prerequisites

Map Location

[dungeon-A2-6F] Ganon's Tower - north of falling floor four torches [top left chest]

Active

Prerequisites

Map Location

[dungeon-A2-6F] Ganon's Tower - north of falling floor four torches [top right chest]

Active

Prerequisites

Map Location

[dungeon-A2-B1] Ganon's Tower - north of Armos room [bottom chest]

Active

Prerequisites

Map Location

[dungeon-A2-B1] Ganon's Tower - north of Armos room [left chest]

Active

Prerequisites

Map Location

[dungeon-A2-B1] Ganon's Tower - north of Armos room [right chest]

Active

Prerequisites

Map Location